Use The EasyDriver Stepper Motor Driver + Arduino
Stepper (or step) motors are really cool. They are perfect for automation or any time you need a motor to turn to a specific point, at a specific speed, in a specific direction. For this article I wont get into why, or how, but unlike typical motors, steppers are able to do all of this, and hold their position when they are not moving - You pay for this by essentially powering them at full power all the time, but you get total control in return.
Steppers are defined in the amount of steps, or degrees that is the minimum turn the motor can make, with 200 steps, or 1.8º motors being the most common. And you can control them relatively easily with your arduino and some Transistors - But today I wanted to do a quick article on hooking up the EasyDriver Stepper Motor Driver sold from sparkfun, the sparkfun sold stepper motor, and your Arduino. I noticed there was a very nice Portuguese article already on the topic, but it did really describe how you connect the motor or mention speed control.
So... The EasyDriver does something called micro stepping, it breaks down that minimum step into smaller micro steps, in this case 8 micro steps per step. Microstepping allows for smoother more accurate control, but that means that your 200 step stepper, connected to the EasyDriver needs 1600 ( 200 * 8 ) steps to make a full rotation - Just take note when you wonder why telling it to step 200 steps barely rotates the motor.
Because steppers hold their position until you tell them to "step" you can easily control their speed with some great advantages. Unlike a typical motor, steppers actually are stronger when moving slower. And... You don't change the amount of power to the motor to control its speed - In fact, you almost never need to change the amount of power to the motor - So just give it what it needs, and keep it that way.
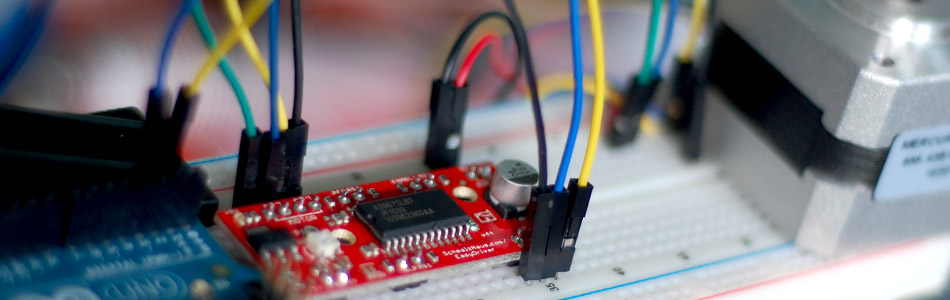
Hooking it up
Only a few things need to connected to use the EasyDriver to use it with your Arduino. You need some 12V source to the EasyDriver (the motor in this article is 12V) - This will be powering the stepper - Im using a 12V adapter - similar to the one in the illustration. Just make sure it is rated at least 750ma - A higher rating is better, and just means it wont burn out. Connect the stepper motor as shown to the EasyDriver - The red/green are one pair, and the blue/yellow are another. If your stepper is different, you can ask us in the forum/discussion area how to find the 2 pairs. Lastly connect the 3 wires from the "gnd", "dir", and "step" of the EasyDriver to the Arduino as shown.

Using the EasyDriver's current regulator
If you use use a higher voltage adapter than your stepper motor is rated at (this one is 12V) you could be supplying too much current, and could damage the motor. You can dial down the current on the easyDriver using the small dial on the board if needed - it can limit the current from 150ma - 750ma. This particular motor is rated at 300ma maximum. This basically gives you a way to only supply the motor what it needs if you could be supplying too much.
Code
I put together some code you can use to control the stepper with your Arduino. I built 2 functions that do the same thing, but one you tell the number of degrees to rotate (negative degrees EG -90 will rotate the oppsite direction) and the other function you tell it the number of micro steps (8 per step) to turn, and again a negative number of steps will make it rotate the other way.
Both functions accept a number between .01 and 1 for speed. .01 is really slow, but strong, and 1 is really fast, but weaker - Anything below .5 seems to be the same strength.
//////////////////////////////////////////////////////////////////
//©2011 bildr
//Released under the MIT License - Please reuse change and share
//Using the easy stepper with your arduino
//use rotate and/or rotateDeg to controll stepper motor
//speed is any number from .01 -> 1 with 1 being fastest -
//Slower Speed == Stronger movement
/////////////////////////////////////////////////////////////////


#define DIR_PIN 2
#define STEP_PIN 3

void setup() {
  pinMode(DIR_PIN, OUTPUT);
  pinMode(STEP_PIN, OUTPUT);
}

void loop(){

  //rotate a specific number of degrees
  rotateDeg(360, 1);
  delay(1000);

  rotateDeg(-360, .1);  //reverse
  delay(1000);


  //rotate a specific number of microsteps (8 microsteps per step)
  //a 200 step stepper would take 1600 micro steps for one full revolution
  rotate(1600, .5);
  delay(1000);

  rotate(-1600, .25); //reverse
  delay(1000);
}


void rotate(int steps, float speed){
  //rotate a specific number of microsteps (8 microsteps per step) - (negitive for reverse movement)
  //speed is any number from .01 -> 1 with 1 being fastest - Slower is stronger
  int dir = (steps > 0)? HIGH:LOW;
  steps = abs(steps);

  digitalWrite(DIR_PIN,dir);

  float usDelay = (1/speed) * 70;

  for(int i=0; i < steps; i++){
    digitalWrite(STEP_PIN, HIGH);
    delayMicroseconds(usDelay);

    digitalWrite(STEP_PIN, LOW);
    delayMicroseconds(usDelay);
  }
}

void rotateDeg(float deg, float speed){
  //rotate a specific number of degrees (negitive for reverse movement)
  //speed is any number from .01 -> 1 with 1 being fastest - Slower is stronger
  int dir = (deg > 0)? HIGH:LOW;
  digitalWrite(DIR_PIN,dir);

  int steps = abs(deg)*(1/0.225);
  float usDelay = (1/speed) * 70;

  for(int i=0; i < steps; i++){
    digitalWrite(STEP_PIN, HIGH);
    delayMicroseconds(usDelay);

    digitalWrite(STEP_PIN, LOW);
    delayMicroseconds(usDelay);
  }
}
Video
Article taken from bildr.org with minor changes - I am the original author of this content